
|
| ||
"Airing Down" - Tire Deflation Methods
by Harry Lewellyn
If you're not a tire air-down fan, skip this. If you are, you'll probably have one of the following tested products in your truck before your next unpaved adventure. With two conventional ways (plus my make-it-yourself kludge), and three commercial air-down products on the market, I thought I'd perform a comparative performance test. I'll quantitatively report deflation time and qualitatively rate ease of use. Actually, there is a variation that I did not test. Harold Sturges (Mr. ReadyAir, as I call him) has two valve stems per wheel. You can either bleed- down two valve stems per tire or bleed- down one and attach a gauge to the other. I'd tend to use the latter approach if I were so equipped. To me, the real question is, why are we in such a hurry to air down anyway? Table 1 shows we're only talking minutes from best to worst. I suspect it's like everything else. We like to be the best, biggest, prettiest, strongest and of course, the fastest, regardless of what it is!
TIRE VALVE PARTS
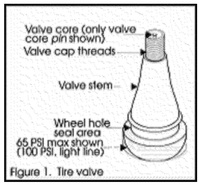
Figure 1 defines the parts of what the Tire and Rim Association, Inc. (TRA) calls a tubeless snap-in valve. A rim valve, by TRA definition, is the bolt-in counterpart. To me, the part that attaches to the wheel (snap-in or bolt-in) is the valve stem. The outside threads receive the valve cap. The inside threads receive the valve core or the actual valve. Only the valve-core's pin head, as the TRA calls it, is shown.
CONVENTIONAL AIR-DOWN
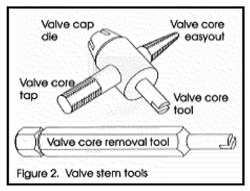
Tire deflation 1A teaches you to either depress or remove the valve core to reduce tire pressure. The pin depression device can take a variety of forms, sticks and stones included. The objective is to depress the pin head as far as possible, not restrict air-flow and ensure your depression device does not get stuck, broken off in or otherwise contaminate the valve stem. For the tests, I used a small finishing nail. The concave head quickly and accurately seated on the stem and minimized air-flow obstruction. To remove the valve cores, I used a commercially available product illustrated in Figure 2. I'll call this the (Big) Red method, since Don Carter is lightening-like at valve removal. I prefer this tool over a metal valve cap/removal tool or multipurpose valve stem/core tool (illustrated). It's easier to use and simplifies one-handed operation. By the way, I recommend the multipurpose tool be carried by all.
Two cautions regarding valve core removal. It's pretty easy to launch a valve into never, never land, never to be recovered. But fear not, for even without a spare, you can use the one in your spare tire. Also be aware that most valve caps seal- off the valve core hole. In an emergency, I'd cautiously consider using a valve cap to seal off the air. Of more concern to me is launching the arrow- like critter into your eye. Wear glasses and practice at home before you use this method in the field! It takes a degree of experience to easily, effectively and safely remove valve cores.
Another thought, with the valves out, is to only valve-cap off the stem with sealing-type valve caps, when at the desired pressure. This would certainly win the air-down test, hands down, but it would add time at air up. However, it would put valve installation on the pavement, reducing valve-loss potential. Let me know how it works.
|
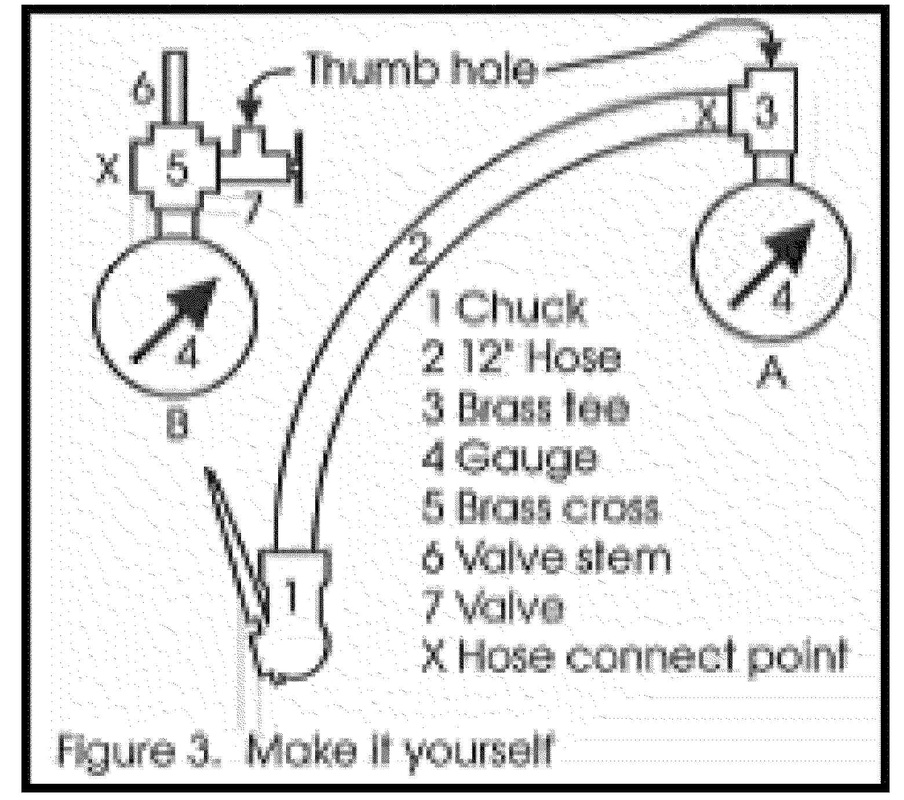
Figure 3 shows a couple of schemes (schematics) I've used for years. For version A, I chuck the kludge on a tire and wait a while (see below). Actually, in the wait-time, I manually bleed air from another tire to save time (multi-task). At the allotted time, I close the open end of the T with my thumb, read the pressure, and either continue to deflate, or move on to the next tire. The thumb/read-the-pressure action is so fast, it's easy to do at any point in the deflation process. I also used the same technique on the QUADRA-FLATE product. Version B, which is what I now use, has a valve at the version A thumb hole and I've added a valve stem. Open the valve and it's just like version A. Close the valve and I can, 1) use the kludge as a gauge, or 2) fill and read pressure. QUADRA-FLATE's Uni-flate and Duoflate are similar products.
|
|
ESTIMATING DEFLATION TIME
With a little practice, I've learned to estimate deflation and inflation time (one- thousand-one, one-thousand-two, etc.) to achieve the approximate pressure I want. I then use the gauge to zero in on the exact pressure. This works with all deflation methods. Add to counting your ability to eyeball the high and low pressure look, and you're armed with yet another tool. If I lose all my toys (gauge included), in an emergency, I can approximate both high and low pressure by counting seconds and observing the tire's trim or pudgy cheeks.
PRESSURE BALANCE
I'm not too low-pressure particular. In practice, I've learned at slow speeds, low pressure balance is not all that important. I've run with up to three PSI difference with no apparent performance degradation. Highway travel is another story! I recommend left-to-right balance be within one PSI. Front-to-back (axle difference) is more a function of load and vehicle, and cannot be universally specified.
QUADRA-FLATE
As the most exotic of all the commercial products, QUADRA-FLATE is far more than just a deflation device. It allows simultaneous four-tire deflation, reinflation and pressure balancing. It can also be used to efficiently move air from good tires to a sick sister, without ever firing up the compressor. In addition, it comes with a built-in gauge. Picture two hoses, one chucked to each front tire, headed for the back. Farther back, short branch hoses chuck to each rear tire. The pair is joined in a first-class brass manifold which also has a gauge and bleeder valve. QUADRAFLATE has chosen plastic-coated hose and a 270°, zero-to-60 PSI dial gauge. Absolutely my first choice for both. The plastic hose is cleaner than conventional rubber hose. The 60 PSI maximum gauge has easy-to-read one-pound scale divisions.
For the test, I chose to raise my tailgate and use the floor immediately inside as a work table. From there, I attached all four chucks, bled-down, then replaced the QUADRA-FLATE in a storage bag.
For the test, I chose to raise my tailgate and use the floor immediately inside as a work table. From there, I attached all four chucks, bled-down, then replaced the QUADRA-FLATE in a storage bag.
OASIS
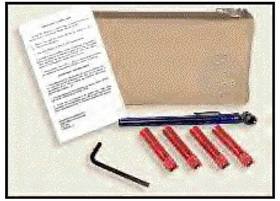
As the second most expensive toy, I call it the no-brainer deflator. Remove valve caps, replace with the TRAILHEAD AUTOMATIC TIRE DEFLATORS, drive off. No need to wait for the tires to deflate. OASIS recommends you stay under 20 MPH and remove them within an hour. This has to do in part, I suspect, with the added vulnerability of the valve stems with such a long extension. The quality, real leather pouch contains four anodized aluminum deflators (about 2" X 3/8"dia.), a 1-20 PSI pencil tire gauge (best I've ever seen), an adjustment tool to preset the automatic deflation pressure and a plastic laminated information card. The card provides use and cleaning instructions. It is a well thought out and presented product.
QUICK AIR
As the basic, plain vanilla deflator, QUICKAIR has incorporated a key ring into its product. The four deflators screw together to make a key fob. They're always handy. This also makes the output end look like a standard valve stem. You can quickly measure the pressure during air-down. Use is straightforward. Simply screw em on, time 'em out, then make your final adjustment. I found them so fast, I struggled to multi-task four at a time!
DEFLATION TEST
The objective was to measure total deflation time for four 31 X 10.50 tires from 28 to 12 PSI, taking advantage of multi-tasking as much as possible. I chose 28 PSI for the high since that is about what most SUV owners run on the Street. I chose 12 PSI for the low as a compromise between my rock crawling pressure (15 PSI) and my sand pressure (10 PSI).
For timing, I took a portal-to-portal approach. I measured all of the time you normally spend airing down. This includes unpacking your toy, using it, then restoring it in the car. I removed and replaced my plastic valve caps for each test. I tried my best to move around the car at about the speed I would if I were not in an air-down race.
Two people were involved. I was the deflator and Jenna Kane was the timer. I was not encumbered with timing. One gauge was used for high pressure and another for low pressure. By the way, the low-pressure gauge included with the OASIS kit is the best I've ever seen. The valve stem end effortlessly and leaklessly seated every time. Also, the long scale made 1/2 PSI measurements extremely easy. Absolute pressure accuracy was not of concern. However, repeatability was. The gauges were tested for flawless repeatability.
I did not consider other variables. Altitude, temperature and sunny-side versus shady-side were all ignored. I did, however, practice with all of the toys several times before performing the tests
Every product was tested as-is, new, fresh out of the box. I then went beyond.
ENVIRONMENTAL TESTS
For me, long-term use and storage and how the product survives my use environment play a key role in my being happy. I tried to simulate hot and cold weather, and our typically dirty, unpaved conditions. These test were not exhaustive, but they did give me a rough idea of each product's performance in the real world. For the hot tests, the kitchen came into play. I used the oven to heat all products to 150° F. I've measured 144° F cab temperatures. High temperature did not adversely affect any products and method. An ice chest and dry ice took the goodies down to -109° F.
The OASIS product would not start when that cold. I suspect the lubricated rubber ball-valve froze to the seat. Enclosed 4Xs will never see this problem. Also, several chucks leaked when cold, but functioned properly when warmed. All other products survived the low- temp test.
I've had reports valve cores will freeze open when airing down in very cold weather. What I believe happens is the moist, cold air within the tire makes ice at the valve and it sticks open. I was unable to duplicate this problem.
All of the products were put in the same bag, at the same time, with dry dirt and sand, and shook and tumbled for two minutes. As I removed each, I manually blew the valve-stem-attach-portion clean. If I felt grit at any time during installation, I removed it and blew on it again (as I would normally do). Each product was then functionally tested.
Dirt took its toll. One QUADRAFLATE chuck check valve got dirt behind it. This required several pressurized depressions to clear. The OASIS product also was contaminated from within, which required disassembly and cleaning. It appeared the ball-valve grease would not let go of the sand and dirt. QUICKAIR came through clean as a whistle.
It's pretty straightforward to keep the OASIS product clean, but I see no way to keep QUADRA-FLATE out of the dirt, when using.
TEST RESULTS
Table 1 shows the overall results. The 12 PSI column includes unpacking. I tend to be rather anal, so the Finish column includes complete repacking of all products.
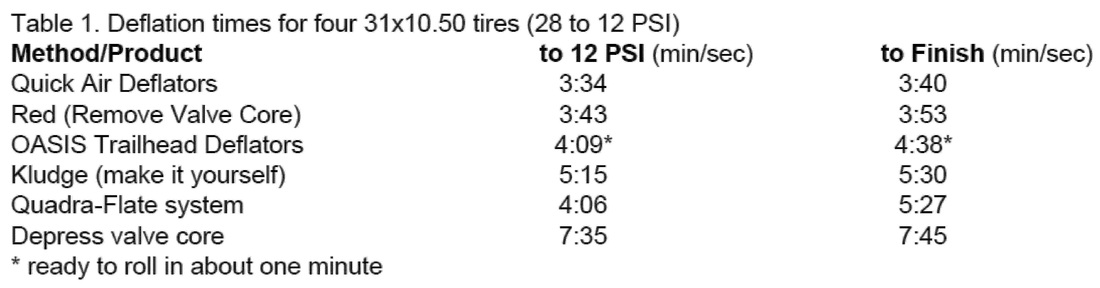
Due to multi-tasking, QUICKAIR lived up to its name. It is the fastest, but Red (valve core removal) isn't far behind. To be fair, OASIS was actually ready to roll in about one minute, excluding repacking. Valve depression finished a distant last, reflecting the serial nature of deflating one tire at a time. Some of you may consider this incentive to purchase one of the tested products.
EASE OF USE
Personal bias and experience play such a significant role in this category, I suggest you take my preferences with a grain of salt - well, maybe salt substitute. I tend not to be in too much of a hurry and on the lazy side. Reliability, convenience and ease of operation are important to me. I'm also stingy with storage space and am frustrated with fussing and digging for something. Finally, since I'm usually playing leader, I like to circulate to observe and help others air down. This makes the OASIS AUTOMATIC TRAIL DEFLATORS the product I will use.
The QUICKAIR deflators are so small, reliable, basic and reasonably priced, I'd find it hard not to make them my first recommendation for deflation. I'll continue to carry and loan them to my tour participants. They are so fast, I suspect two each will keep most folks hopping. Drawback? None.
OASIS advises of a potential drawback. They specify 30 PSI minimum start pressure. After three or four times, all of mine opened at less than 30 PSI, but since I normally run 24 to 26 PSI, I may encounter a situation (cold) where I would have to inflate to deflate. Not a Coyote kind of deal!
QUADRA-FLATE is in a class by itself. It is a quality product. I see so many in the field, I'm probably in a minority with my reservations. I also tend to be real lazy and impatient. I found unbagging, reeling-out and packing the unit trying. Each chuck was like a hook that snagged on the hoses, things in my truck and on the tires. The tests were performed in my garage, but I suspect, in the field, the chucks will see much dirt, sand and mud.
© Harry Lewellyn
Ecological 4-Wheeling Adventures
2234 Catherine Pl.
Costa Mesa, CA, 92627-1815
Phone (949) 645-7733
FAX (949) 645-7738
E-mail: [email protected]
http://4wdadventures.com